
These off-grid/ no grid survival projects will spark your interest If you’re looking to embrace a more self-sufficient lifestyle, they will help you tap into your resourcefulness and creativity. Each project offers straightforward steps and a list of basic materials you’ll need, from building a DIY solar oven to creating a rainwater collection system. Start small, gather your supplies, and dive in—whether you’re prepping for nature’s unpredictability or just want to enjoy the simplicity of off-grid living, these ideas will get you started in no time!
Building a Solar Water Heater
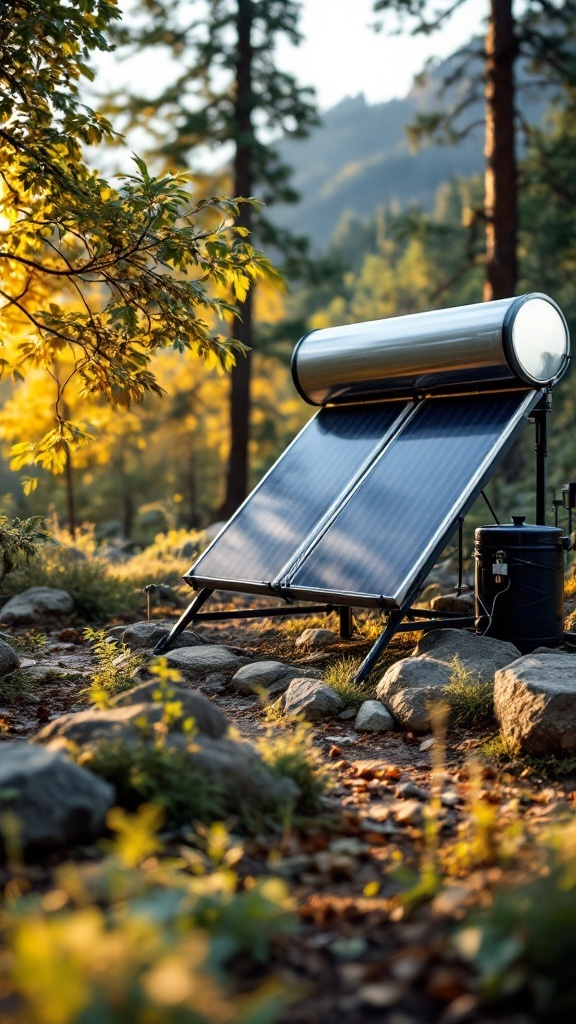
When you think about off-grid survival, having access to hot water can be a game changer. A solar water heater is a practical project that can provide you with hot water using the sun’s energy.
The image shows a well-constructed solar water heater. It features solar panels that absorb sunlight and convert it into heat, warming the water stored in the tank. This setup can be placed in your backyard, in a sunny spot, making it perfect for those embracing a no-grid survival lifestyle.
To get started, you’ll need some basic materials. These include solar panels, a water tank, pipes, and a frame to hold everything in place. You can often find these materials at local hardware stores or online.
Here are some tips: first, choose a location that gets plenty of sunlight throughout the day. Ensure the panels are angled correctly for maximum exposure. Additionally, insulating your water tank will help maintain the temperature, making your system more efficient.
Once you have everything set up, you can enjoy hot showers or warm water for cooking, all while staying off the grid. This project not only boosts your self-sufficiency but also reduces reliance on traditional energy sources. Remember, you can also cook outdoors with the sun using solar ovens.
Building a Smokehouse

Creating a smokehouse is not just a fun weekend project; it’s a practical addition to your off-grid lifestyle. This simple structure allows you to preserve meats and fish, adding flavor and extending their shelf life. If you’re diving into no grid survival, a smokehouse can be a key element in your food preservation strategy.
To start building your smokehouse, you’ll need some basic materials. Gather wood for the frame, metal sheets for the roof, and wire mesh for ventilation. You’ll also want to include a smoke source, like a small fire pit or a stovepipe. If you’re short on materials, consider repurposing old pallets or scrap wood.
Once you have your materials, choose a location that’s away from your main living area to avoid smoke buildup. Start by constructing the frame, ensuring it’s sturdy and well-ventilated. Then, add the roof and secure the walls. Creating an entry door will help you access the inside easily when you’re ready to load it with your favorite meats.
When it comes to using your smokehouse, choose your meats wisely. Pork, chicken, and fish work well. Prepare your meat by brining or seasoning it, and then hang it inside the smokehouse. Make sure your smoke source is consistent to maintain the right temperature for smoking. This process can take several hours, so plan accordingly.
To wrap things up, having a smokehouse can really enhance your off-grid survival skills. Not only does it allow you to enjoy delicious smoked treats, but it also supports your self-sufficiency. So gather your materials, get started, and enjoy the fruits of your labor!
Constructing a Rocket Stove
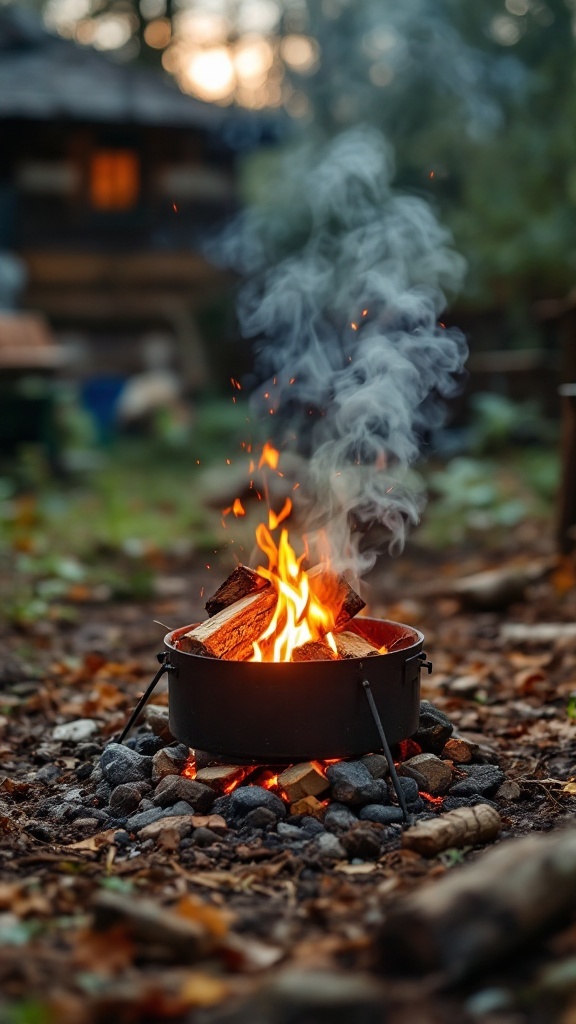
The image captures a cozy scene of a fire burning brightly in a rocket stove setup, nestled amidst a natural setting. This type of off-grid stove is efficient and simple, making it an excellent choice for no-grid survival enthusiasts.
Rocket stoves are not just about cooking; they utilize limited fuel while maximizing heat output. This image shows the flames licking at the logs, which is a key feature of how a rocket stove operates. Using a small amount of wood, you can achieve a high cooking temperature while minimizing smoke.
To get started with your own rocket stove, you’ll need a few basic materials. Gather some bricks or stones for the structure, a metal container (like a pot) for cooking, and wood for fuel. You might also want some basic tools like a shovel for digging and a hammer for securing your structure.
When constructing your stove, begin by creating a sturdy base with bricks or stones. Arrange them to form a rocket shape, ensuring there’s a chimney for smoke to escape. Once the structure is secure, place your cooking pot on top and load it with small pieces of wood. Light the fire, and you’re ready to cook!
Keep in mind the importance of safety and proper ventilation. Always build your stove in an open area, away from flammable materials. This will not only enhance your cooking experience but also ensure you stay safe while enjoying your off-grid lifestyle.
Developing a Permaculture Garden
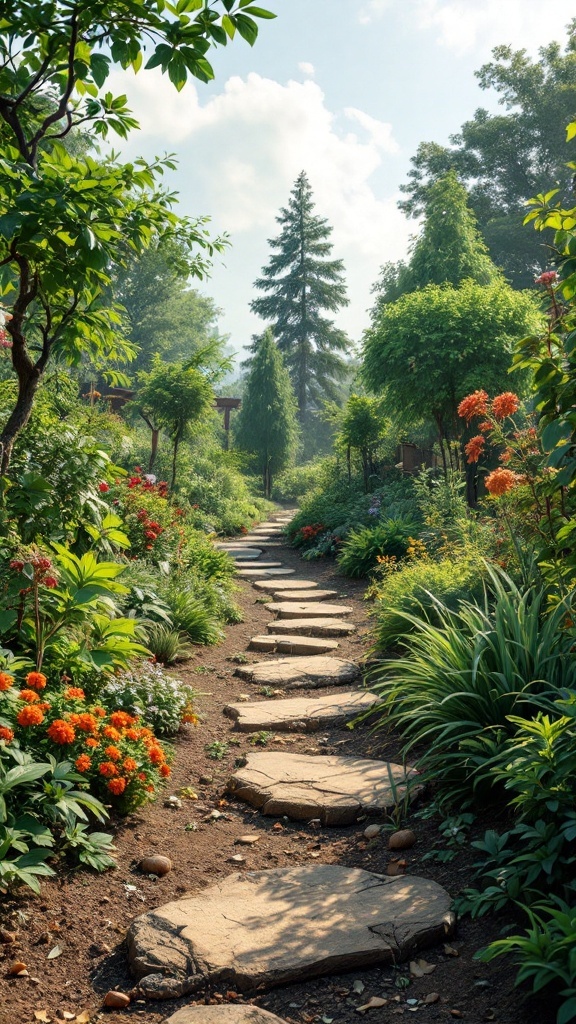
Creating a permaculture garden is a vital step to self-sufficient living off-grid. Imagine walking down a pathway like this one, surrounded by vibrant flowers and lush greenery. It’s not just about growing food; it’s about designing a sustainable ecosystem that works with nature.
To start your permaculture garden, you’ll need a few basic materials. Gather seeds for herbs, veggies, and flowers that thrive in your climate. Compost is also essential for enriching the soil. Consider materials for pathways, like stones or wood chips, to create walking spaces that help maintain the garden’s layout.
Before planting, observe your space. Take note of sunlight patterns, water flow, and existing plants. This will help you design a layout that maximizes resources and minimizes work. Group plants together that support each other, like pairing nitrogen-fixing plants with those that need extra nutrients.
Start small. A section of your yard or even a few pots on a balcony can be the perfect place to begin your off-grid journey. As you gain experience, you can expand your garden, adding more plants and features like rainwater collection systems or compost bins. Remember, the aim is to create a thriving space that provides food and beauty.
Installing a Wind Turbine

Setting up a wind turbine is a fantastic step for anyone interested in no grid survival. These turbines convert wind energy into electricity, providing power for your off-grid lifestyle.
The first thing you’ll need is a suitable wind turbine. Look for one that meets your energy needs and is designed for your local wind conditions. Larger turbines generate more power, but they require more space and a higher installation point.
Next, gather the basic materials needed for installation. This includes the turbine itself, a tower for mounting, wiring, and a battery storage system. You might also need concrete for anchoring the tower, and tools like a drill, wrench, and level.
Before you start, check local regulations. Some areas have specific rules about wind turbine installations. Also, choose an open area away from tall trees or buildings to maximize wind flow.
When you’re ready to install, start by setting up the tower. Make sure it’s sturdy and straight. Then, connect the turbine to the tower and run the wiring to your battery system. Finally, double-check all connections to ensure everything is secure.
Once installed, monitor the turbine’s performance. Regular maintenance will help it run efficiently and prolong its life. With a wind turbine, you’ll harness nature’s energy and enhance your off-grid setup.
Creating a Composting Toilet
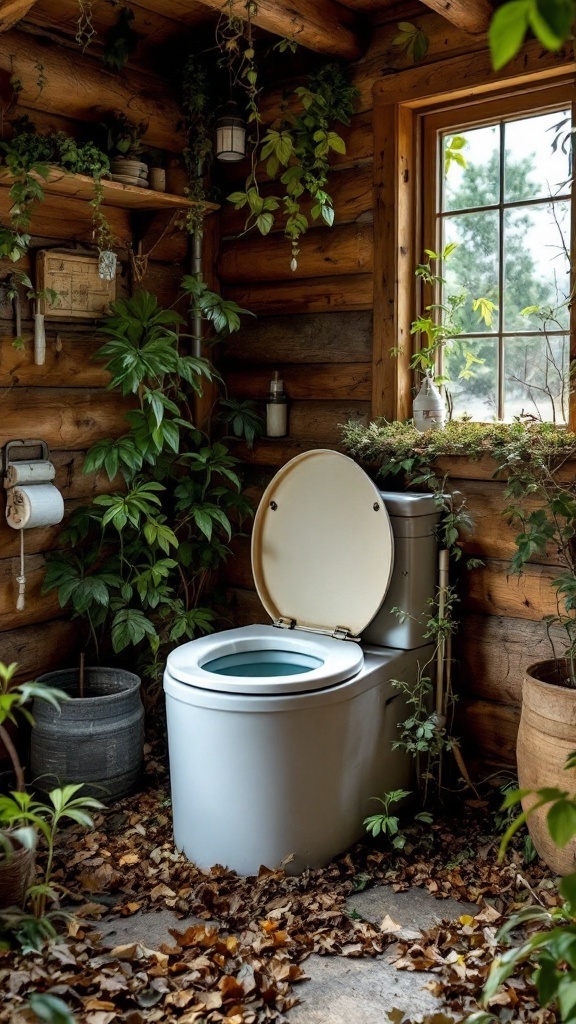
When you think about off-grid living, sanitation solutions are crucial. A composting toilet is a smart choice for those wanting to live without a traditional plumbing system. The image shows a cozy bathroom setup with a composting toilet nestled among plants, creating an inviting space.
To get started on your own composting toilet, you’ll need some basic materials. You’ll want a toilet seat, a sturdy container for composting, and a carbon-rich material like sawdust or shredded leaves. These materials help break down waste and reduce odors.
Installation is straightforward. First, find a suitable spot in your home or cabin. Make sure it’s well-ventilated. Next, set up the container under the toilet seat. When you use the toilet, cover the waste with your carbon material. This step is essential for maintaining hygiene and odor control.
Regular maintenance is key. Every few weeks, you can check the composting container. When it’s full, you can transfer the compost to a larger bin outside to continue breaking down. After a few months, you’ll have nutrient-rich compost suitable for non-edible plants. Remember, this composting process is perfect for no grid survival, keeping you self-sufficient.
So, if you want to embrace off-grid living, consider building a composting toilet. It’s simple, eco-friendly, and a step towards sustainable living.
Creating a Natural Swimming Pond
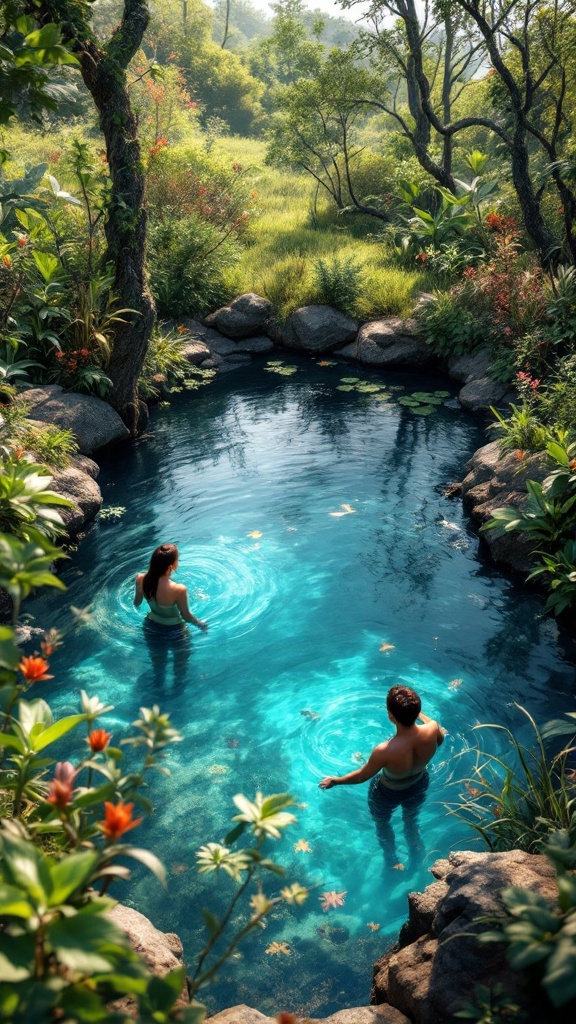
Building a natural swimming pond is a fantastic project for those living off-grid. It offers a beautiful space to relax and enjoy nature. Unlike traditional pools, these ponds use plants and natural filtration to keep the water clean, making them eco-friendly.
To get started, you’ll need some basic materials. First, plan your pond shape and size. You can use a liner or dig a hole and shape it to your liking. Next, gather rocks and stones for the edges and a variety of aquatic plants for filtration. Consider adding a few lily pads for beauty and shade.
Once your pond is shaped, fill it with water and add your plants. They help maintain balance in the ecosystem and keep the water fresh. Keep in mind to ensure your pond has shallow areas for plants and deeper areas for swimming.
A few tips for maintenance include regularly checking water levels and cleaning any debris. It’s also helpful to have a pump for circulation, although that’s optional if you prefer a more natural approach. This project not only enhances your off-grid lifestyle but also creates a refreshing space for swimming and relaxation.
Setting Up Rainwater Collection
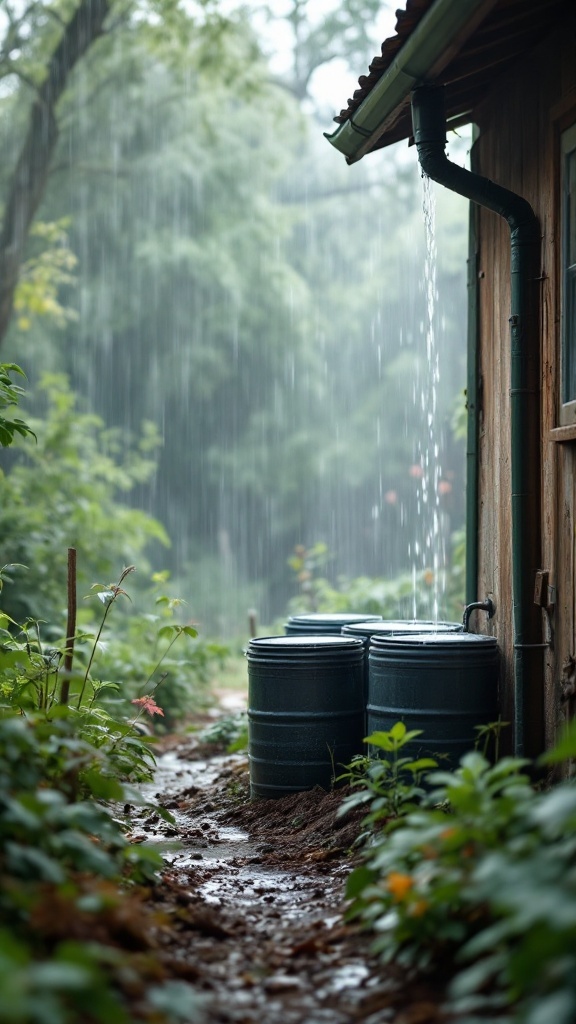
Setting up a rainwater collection system is essential for anyone interested in off-grid living or no grid survival. The image shows a cozy cabin with rainwater pouring from a gutter into large barrels. This simple setup can provide a significant amount of water for various needs.
To start, you’ll need a few basic materials. First, gather some rain barrels or large containers to collect the water. You’ll also need a gutter system to direct the rainwater effectively. If your cabin doesn’t have gutters, you can easily install them along the roof’s edge.
Next, ensure your barrels are clean and safe for water collection. You might want to add a screen to the top of the barrel to keep out debris and insects. This is an easy step that can save you from headaches later on.
When it rains, the water will flow from the roof into the gutters and down into the barrels. Be sure to position your barrels in a place that catches the most water. Placing them near downspouts is usually a good idea.
As you set up your collection system, think about what you’ll use the water for. It can be useful for watering plants, flushing toilets, or even washing clothes. Just remember, if you plan to use it for drinking, make sure to filter and purify the water properly.
To sum up, setting up a rainwater collection system is a practical step for anyone looking to thrive in an off-grid lifestyle. With the right materials and a little effort, you’ll be on your way to sustainable water use!
Making Herbal Salves
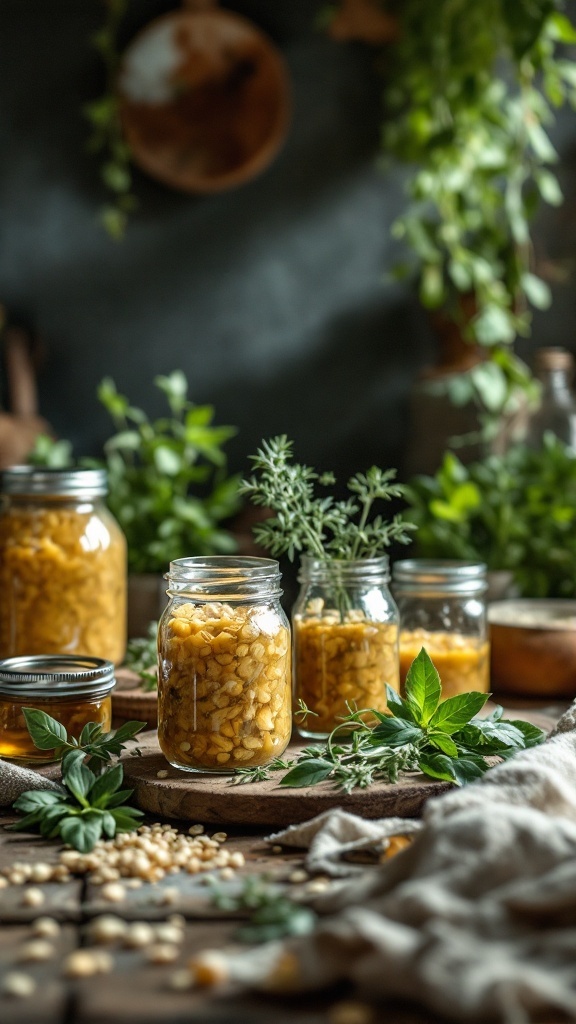
Herbal salves are a fantastic addition to your no grid survival toolkit. They harness the natural healing properties of plants to help with various skin ailments. Having a medicinal garden is a natural way to keep healthy and save money!
To get started, you’ll need a few basic materials. Gather some fresh or dried herbs like lavender, calendula, or comfrey. You’ll also need a carrier oil (like olive or coconut oil), and beeswax to help solidify the salve. Don’t forget jars for storage!
Here’s a simple recipe to kick things off. First, infuse your herbs in the carrier oil. You can do this by heating them gently in a double boiler for a few hours. Strain the herbs out, leaving just the infused oil. Next, measure out about 1 cup of the infused oil and combine it with ¼ cup of beeswax in a pot. Heat until the beeswax melts completely.
Once melted, pour the mixture into your jars and let it cool. You can add essential oils for fragrance or extra healing properties if you like. And there you have it—a simple herbal salve that’s perfect for those living off-grid. It’s a small step that can make a big difference in your self-sufficiency journey! Here’s a DFY medical garden kit to make it easy to start planting the most popular and beneficial plants for medicinal teas, tinctures, and salves.
Building a Hydroponic System
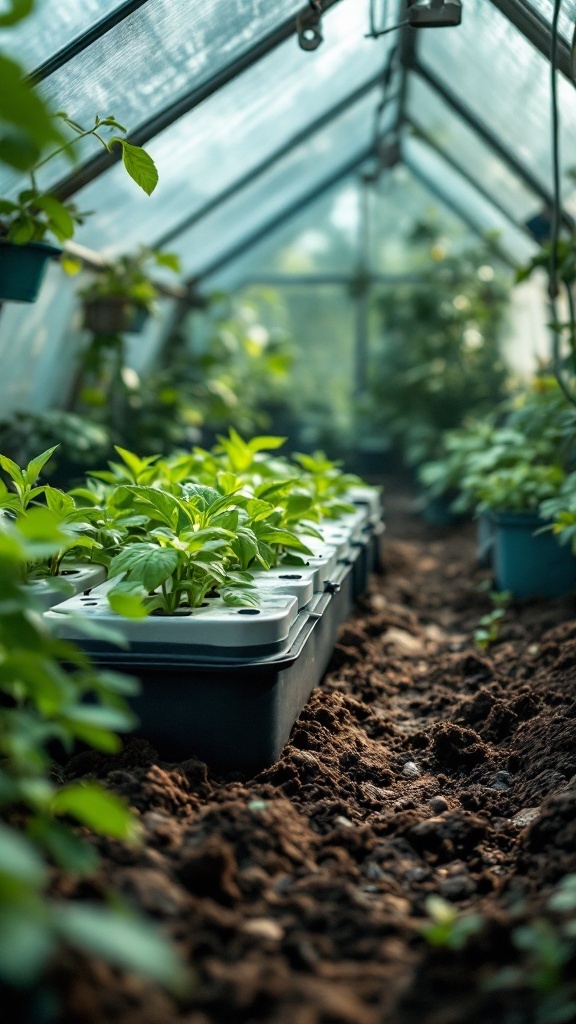
Hydroponic systems are a fantastic way to grow food without traditional soil. In the image, you can see a greenhouse filled with lush green plants growing in a hydroponic setup. This method is perfect for off-grid living, allowing you to cultivate fresh produce even when you’re away from city conveniences.
To get started with your own hydroponic system, you’ll need some basic materials. These include containers for your plants, a nutrient solution, a growing medium like rock wool or clay pellets, and a water pump or reservoir. It’s also helpful to have a pH meter to monitor the nutrient solution.
Setting up your system is straightforward. First, choose a location with good light, whether natural or from grow lights. Then, arrange your containers to allow for adequate space between them. Fill the containers with your growing medium and plant your seeds or seedlings. Mix your nutrient solution according to the instructions and add it to the reservoir.
One important tip is to regularly check the water levels and nutrient concentration. This ensures your plants get everything they need to thrive. With a bit of care, you’ll see your plants flourish in this no grid survival setup, providing you with fresh food all year round.
Constructing an Earth Bag Shelter
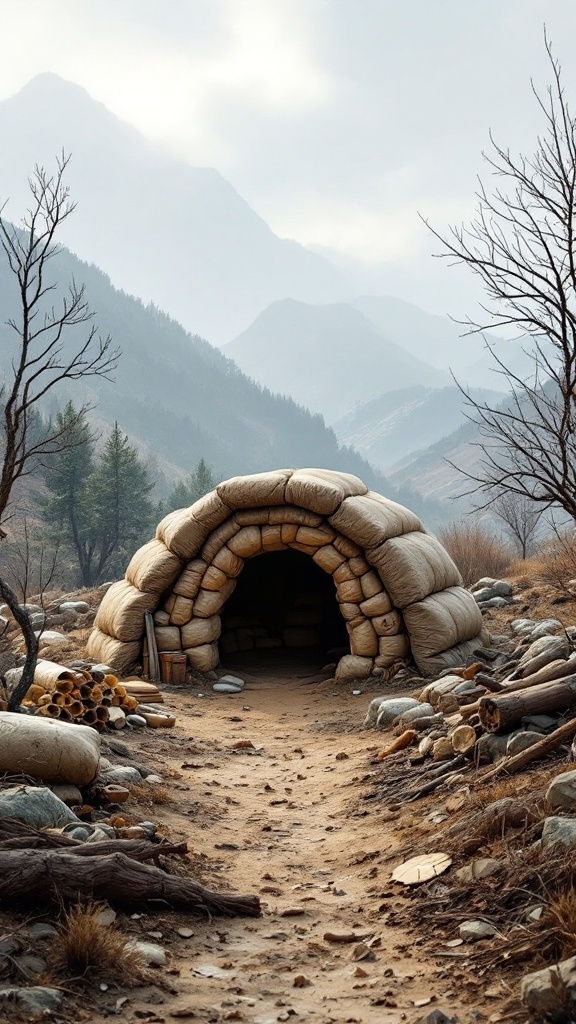
Building an earth bag shelter is a fun and practical project for those interested in no grid survival. This type of structure uses bags filled with soil to create a sturdy and natural home. The image above shows a welcoming earthbag shelter nestled in a scenic landscape, surrounded by mountains and nature.
To start, you’ll need some basic materials. Gather polypropylene bags, which are often used for storing grains. You will also need soil, which can be sourced from your building site. Optional materials include barbed wire for stabilization and a rainwater collection system for off-grid living.
Begin by laying out your design. A dome shape, like the one in the image, is efficient for both strength and insulation. Fill the bags with damp soil, then stack and compact them to form walls. Make sure to reinforce with barbed wire between layers. This helps hold everything together.
When constructing your earthbag shelter, consider the local climate. Insulating the roof can enhance energy efficiency. You can also add windows and a door to make it livable. And remember, working with a friend can make the process easier and more enjoyable!
Overall, an earthbag shelter is a sustainable choice for off-grid living. It’s not only eco-friendly, but it also connects you with nature, making it a rewarding project for anyone looking to embrace a simpler lifestyle.
Creating a Foraging Map
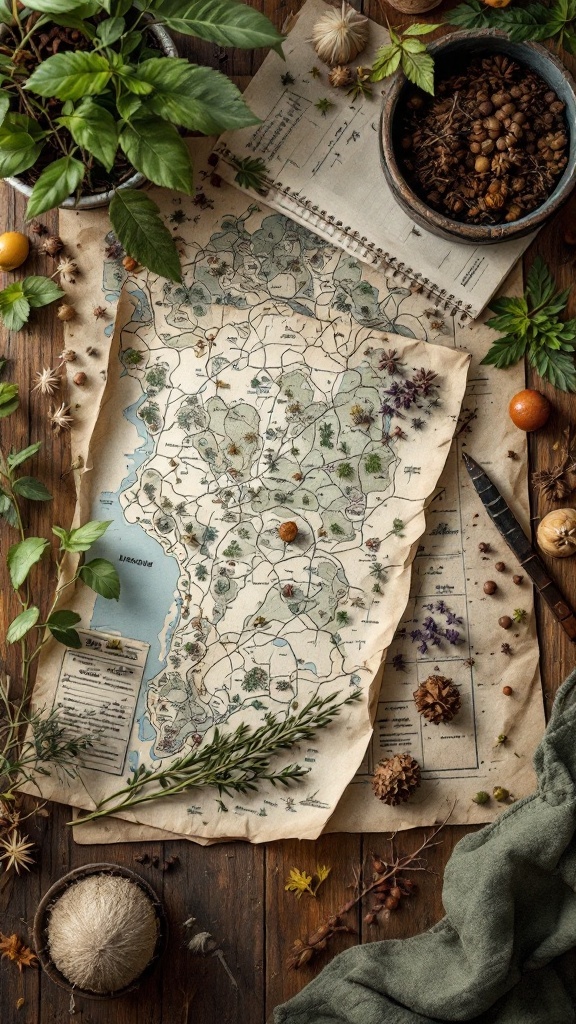
When you’re off-grid, knowing where to find food is crucial. A foraging map can help you identify local edible plants and resources. The image here shows a beautifully detailed map surrounded by herbs, seeds, and natural elements, emphasizing the importance of understanding your surroundings.
To start, gather some basic materials: paper or a notebook, a compass, and markers. You’ll also want a reliable guidebook about local plants to help you identify what’s safe to eat.
Begin by exploring your area. Walk through different environments like forests, meadows, and streams. Note the locations of wild edibles you find, like berries, nuts, or herbs. Mark these on your map, using symbols or colors to represent different types of plants.
It’s a good idea to include notes about the best times to harvest each plant. This way, you can plan ahead and ensure you’re gathering food at the right time. Also, remember to keep your map updated as you discover new foraging spots.
Creating a foraging map not only enhances your no grid survival skills but also connects you with nature. It’s a fun project that pays off in delicious ways!
Designing a Root Cellar
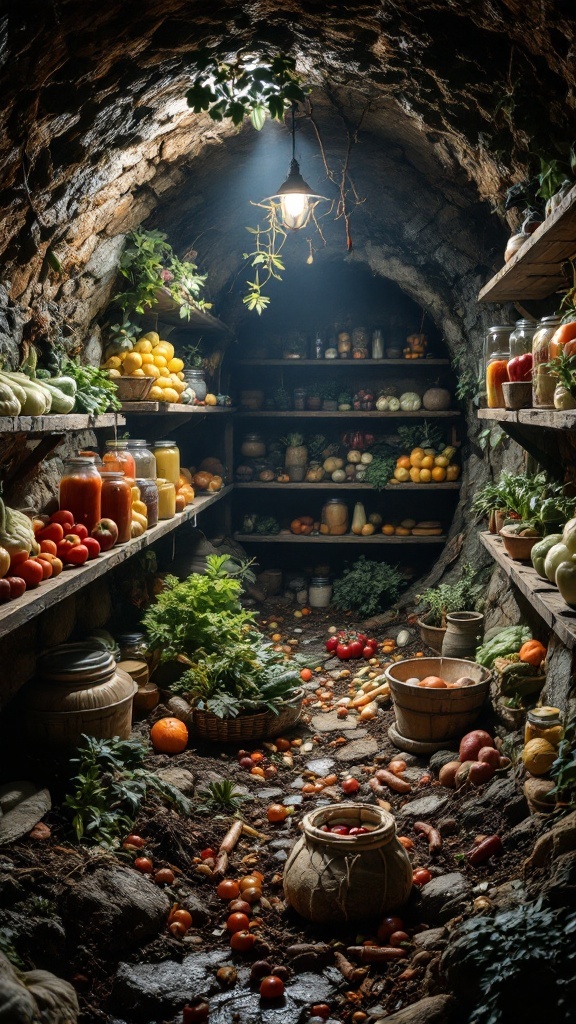
A root cellar is a practical solution for off-grid living, allowing you to store fruits and vegetables for longer periods. The image captures a beautifully organized root cellar brimming with various produce. Shelves made from rustic wood display jars of canned goods and fresh seasonal vegetables, while the earthy ground is scattered with colorful fruits and vegetables.
When designing your root cellar, consider its location. Ideally, you want it underground or partially buried to maintain a cool temperature. This is especially important for no grid survival, as it helps preserve your harvest without electricity.
Basic materials needed to build a root cellar include wooden boards for shelving, insulation materials like straw or foam, and possibly stones for the walls. If you’re feeling ambitious, you might even want to dig out a space yourself!
To get started, select a spot in your yard that stays cool and shaded. Dig a hole that’s deep enough to keep your food at a stable temperature, around 32°F to 40°F. Construct your shelves, ensuring they’re sturdy and well-ventilated. With some planning and effort, you’ll create a space that keeps your food fresh for your off-grid lifestyle.
Setting Up a Beekeeping Station
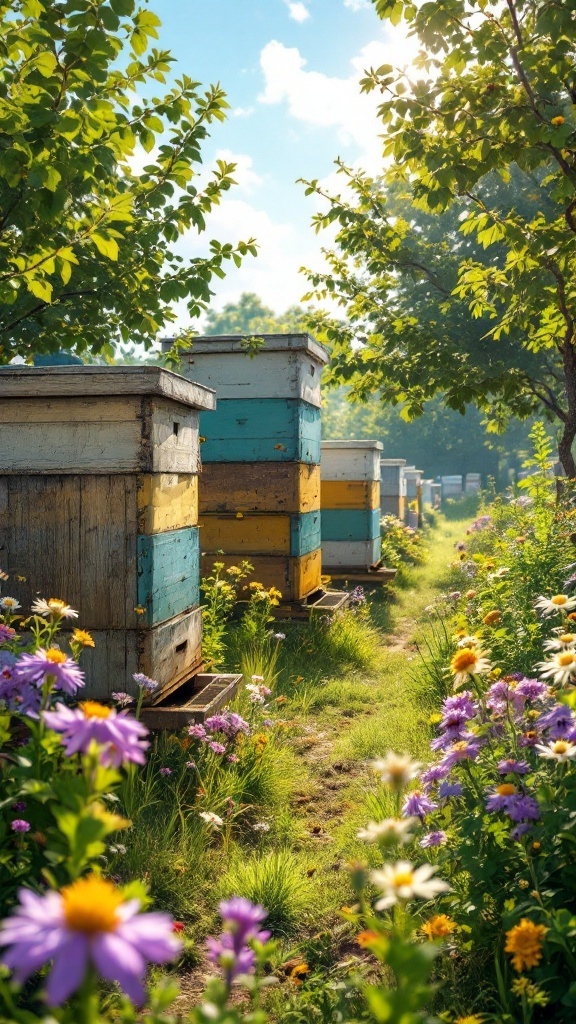
Creating a beekeeping station can be a rewarding project in your off-grid survival journey. It not only provides honey but also helps pollinate your garden and supports local ecosystems.
The image captures a serene beekeeping setup surrounded by blooming flowers and lush greenery. It’s a perfect illustration of how beautiful and beneficial a beekeeping station can be. Those colorful hives stand out, highlighting the natural harmony bees can create in an off-grid environment.
To get started with your own beekeeping station, you’ll need some basic materials. Essential items include beehives, protective gear, a smoker, and tools for managing the hive, like a hive tool and bee brush. You can often find starter kits online or at local farm supply stores.
Choosing the right location is crucial. Ideally, your station should be near a water source and plenty of flowering plants to give your bees plenty of food. Be sure to place the hives in a sunny spot with some protection from the wind.
When you’re starting out, consider getting a package of bees or a nucleus colony to establish your hive. It’s also helpful to connect with local beekeeping clubs or online communities for support and guidance. They can offer tips, share experiences, and help you troubleshoot any issues that arise.
Establishing Livestock Areas
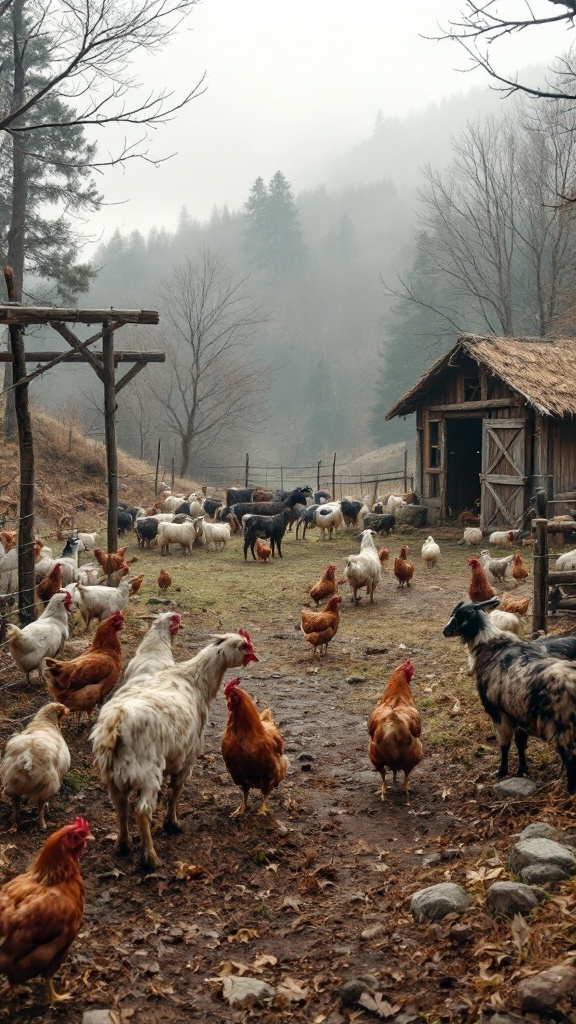
Creating a livestock area is a vital part of off-grid living. This image beautifully captures a serene setting where various animals roam freely. Chickens, goats, and other livestock grace the landscape, demonstrating how nature and farming can harmonize.
To start your own livestock area, you’ll need some basic materials. Fencing is essential to keep your animals safe and contained. Consider using wooden posts and wire fencing for durability. You’ll also want to create shelter from the elements. A simple barn or shed can provide a cozy home for your animals.
When choosing livestock, think about what suits your needs. Chickens are great for eggs, while goats can provide milk and help clear brush. Start with a few animals to see how they fit into your routine. Also, ensure you have a reliable source of food and fresh water for them.
Getting started can be easy. Research local regulations regarding livestock. Connect with other off-grid enthusiasts for tips and support. Don’t hesitate to make adjustments as you learn what works best for your setting.
Being Self-sufficient for the Long Haul
Transform your property into a thriving, self-reliant oasis with The Self-Sufficient Backyard—a comprehensive guide crafted from 40 years of hands-off-grid living. Imagine slashing utility bills, growing nutrient-rich food in just 1,020 square feet per person, and harnessing renewable energy with a hybrid electricity system that’s both affordable and grid-independent. Dive into step-by-step projects like building rainwater collection tanks for free irrigation, and creating a medicinal garden with 7 powerhouse herbs (turned into tinctures for natural remedies). Whether you’re on a quarter-acre homestead or a small urban lot, this guide adapts to your space, empowering you to live sustainably, profit from surplus produce, and safeguard against rising costs or grid failures. Join thousands who’ve turned dependence into independence—your self-sufficient future starts here.

