
I discovered something magical while experimenting with indoor gardening: a simple, no-fuss method to grow crisp lettuce without dirt. This approach changed how I think about fresh produce, especially in my small apartment kitchen.
The technique uses basic glass containers and water enriched with nutrients. Developed by researchers at the University of Hawaii, it eliminates pumps and complicated equipment. You literally set it up once and watch your greens thrive.
What makes this system special? It works while you sleep. The plants drink exactly what they need as the water level naturally drops. No daily check-ins or guesswork required – perfect for busy schedules or forgetful gardeners.
Through this guide, I’ll show you how to create your own thriving mini-garden. You’ll learn to choose the right containers, mix nutrient solutions, and maintain ideal growing conditions. Best part? You can start with items already in your cupboard and enjoy harvests within weeks.
Introduction to Mason Jar Hydroponics
My adventure with soil-free gardening began when I grew frustrated with pricey setups. Commercial systems felt like solving calculus problems just to grow salad greens. Then I found a better way – one that fits on windowsills and costs less than takeout.
From Fancy Gadgets to Simple Solutions
After my third Aerogarden pump died, I almost gave up. That changed when I saw a friend’s thriving basil in a glass container. No cords, no noise – just roots dancing in amber liquid. I converted my pasta jars that weekend.
Why Glass Beats Plastic Every Time
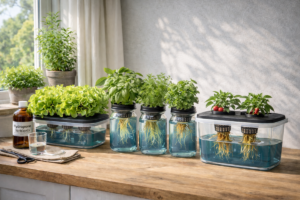
Clear containers let me monitor root health and water levels easily. Wide-mouth versions became my favorite – no struggling with narrow openings during cleaning. Here’s how they stack up:
| Feature | Wide-Mouth | Regular-Mouth |
|---|---|---|
| Net Cup Fit | Snug & stable | Requires modification |
| Cleaning Ease | Wipe-and-go | Brush required |
| Root Space | Ample room | Crowded growth |
Lettuce became my first success story. These greens grow faster than in soil – I harvested baby leaves in 18 days. Now my kitchen grows four varieties simultaneously, each in its own nutrient-rich home.
Understanding the Kratky Method for Hydroponics
A university study changed my perspective on plant care forever. Dr. Bernard Kratky’s research at the University of Hawaii revealed how greens can flourish with near-zero maintenance. This self-regulating system works because plants become their own caretakers – no pumps or timers needed.
The Science Behind a Non-Circulating System
Here’s what fascinated me: roots split into two teams. The lower ones drink the nutrient solution, while upper roots breathe air. As water levels drop naturally, plants develop these air roots automatically. It’s like they grow their own snorkel!
The magic happens in the gap between water and jar lid. This airspace expands as the plant consumes liquid, creating perfect oxygen levels. Lettuce thrives here because it’s a light feeder – one initial mix fuels 3-4 weeks of growth.
Essential Equipment and Materials
Through trial and error, I’ve refined my toolkit. Wide 64-ounce containers are ideal – they prevent root crowding and let you monitor progress. Pair them with 3-inch net cups that snugly hold seedlings without tipping.
Rockwool cubes became my go-to for starting seeds. They retain moisture without drowning delicate roots. Neoprene collars? Absolute game-changers. They block light from reaching the water, stopping algae before it starts.
For nutrients, I use a basic hydroponic formula mixed at half-strength. No fancy additives required – lettuce wants simplicity. Set it once, and walk away until harvest day.
Setting Up Your Mason Jar System
Creating your own thriving greens station takes less time than brewing coffee. Let’s transform basic items into a self-watering wonder. First, we’ll gather supplies, then walk through assembly like building LEGO blocks for plants.
Gathering What You Need
My favorite containers are wide 64-ounce glass ones – they’re roomier than standard pickle jars. You’ll need 3-inch net cups that fit snugly in the openings. Here’s how different sizes compare:
| Container Size | Best For | Harvest Time |
|---|---|---|
| 32 oz | Herbs | 4-6 weeks |
| 64 oz | Lettuce | 6-8 weeks |
| 1 gallon | Kale | 8-10 weeks |
Rockwool cubes work best for starting seeds – they hold moisture without rotting. Grab clay pebbles to support stems, and a basic nutrient mix. Skip expensive formulas – lettuce thrives on simplicity.
Building Your Plant Home
Mix nutrients with water using half the recommended strength. Fill containers until liquid just touches the net cup’s bottom. This creates the crucial air gap roots need to breathe.
Place pre-soaked rockwool cubes in net cups, then surround with clay pebbles. Position cups so only the cube’s base contacts water. My pro tip? Use foil around jars to block light and prevent algae.
Set your garden near a sunny window or under grow lights 6 hours daily. Within days, you’ll see white roots reaching downward while leaves stretch upward. No stirring, no pumps – just quiet growth magic.
Mason Jar Hydroponics for Growing Lettuce
Growing crisp greens in transparent containers became my obsession after tasting that first homegrown leaf. The secret? Balancing three elements: water chemistry, nutrient strength, and light exposure. Let me walk you through the exact ratios and routines that transformed my countertop into a salad factory.
Optimizing Water Levels and Nutrient Mixing
Lettuce thrives in slightly acidic conditions. I keep my solution between pH 5.5-6.0 using test strips – simple drops reveal when adjustments are needed. For nutrients, Masterblend’s 4-18-38 formula works wonders mixed at 2 grams per gallon. Here’s how top brands compare:
| Nutrient | NPK Ratio | Best For | Mixing Ease |
|---|---|---|---|
| Maxigro | 10-5-14 | Leafy Greens | Quick-dissolve |
| Masterblend | 4-18-38 | Balanced Growth | Multi-part mix |
| Flora Series | 2-1-6 | Delicate Seedlings | Liquid concentrate |
Fill containers until the liquid kisses the net cup’s base. This creates the perfect air gap – roots drink below while breathing above. In my 64-ounce setup, this initial fill lasts 6 weeks without refills.
Light makes or breaks your harvest. Position containers where they’ll get 7 hours of direct sun daily. No sunny window? LED grow lights 6 inches above plants for 12 hours work equally well. Rotate jars weekly for even leaf development.
Watch for white, fuzzy roots – they signal happy plants. Brown strands mean oxygen issues. Simply trim affected parts and refresh the solution. From seedling to salad bowl, most varieties mature in 35-45 days. Harvest outer leaves first, and your plants keep producing!
Troubleshooting and Enhancing Your Hydroponic Setup
My lettuce leaves started curling last summer, and I panicked. Through trial and error, I learned to spot early warning signs and fix them fast. Let me show you how to keep your greens thriving when challenges pop up.
Managing Light, pH, and Nutrient Concerns
Yellowing leaves often scream “feed me better!”. I test water weekly with a $15 pH meter – aim for 5.8-6.2. If numbers climb, add a drop of white vinegar. Too low? Baking soda does the trick.
Light issues show up as leggy stems or pale leaves. My fix: move containers closer to windows or extend grow light time by 2 hours. Use a timer for consistency – plants love routines as much as we do.
Tips for Preventing Algae and Other Issues
That green slime coating your container? Block light completely. I wrap mine in old T-shirts – free and breathable. Aluminum foil works too, but avoid airtight covers. Roots need oxygen exchange.
For stubborn algae outbreaks:
- Replace nutrient solution immediately
- Scrub containers with hydrogen peroxide
- Add 1ml peroxide per gallon to prevent regrowth
Stunted growth often means crowded roots. Upgrade to larger containers if strands fill the space. Remember: happy roots mean crisp, abundant leaves!
Wrapping Up Your Indoor Garden Adventure
Transforming my kitchen into a lush garden taught me more than growing greens—it revealed how simple sustainability can be. Through this journey, I’ve mastered mixing nutrients, balancing pH, and trusting the self-watering magic of the Kratky method. Those first crisp leaves tasted like victory, but the real win? Knowing I can grow food anywhere, anytime.
This system keeps giving. Wide-mouth containers get reused season after season—just toss them in the dishwasher. Net cups and clay pebbles revive with a quick rinse. Start new seeds every few weeks, and you’ll never run out of fresh salads. It’s gardening made for busy lives.
Why stop at lettuce? Try basil or mint next—they thrive in the same setup. Share extras with friends; their amazement when seeing your countertop oasis is priceless. Together, we’re proving fresh food isn’t just for backyard plots.
Every bite connects me deeper to what I eat. No more wilted grocery store greens. Just vibrant, homegrown flavor that defies seasons. Ready to taste your own success? Your herb garden awaits.
